
Transparencies
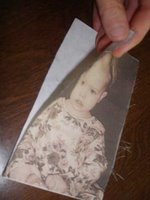
Let's start with transparencies. There are several techniques that you can do. You can print right onto transparencies with a regular ink jet printer. Just make sure you buy the kind that say "Ink Jet Printer Transparency Film." You can manipulate your photo all you want first. Then print out onto the transparency following the directions in the box. If you have words on your picture, make sure to print mirror image.
Using a brush, put a layer of gel medium onto the paper that you want to transfer your photo to. Then put your transparency with shiny side UP and the side that the ink was printed on, down onto your paper. Rub firmly with a credit card. Wait a couple of minutes (you can check on it by peeling it up a bit) and then carefully remove the transparency. Your photo will remain on the paper! I did that technique here, then decided I wanted more color, so I placed the transparency back onto the photo and it stuck, because it still had gel medium on it. I like how you can see the brush strokes through, so it now has a layered effect.
If you have a Xyron machine, you can put the transparency right through and then you can adhere the picture to anything you'd like. Here I attached it to a library card. Paper with writing on it looks neat, since you can see the writing through the picture. If you don't have a Xyron, you can use glue dots to adhere it to the paper.
Tissue paper
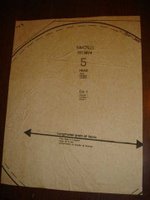
You can can print a picture onto tissue paper, by first adding a "carrier" onto the tissue so that it is thick enough to send through your printer. Spray a light coat of spray adhesive onto an 8.5x11" sheet of white copy paper. Carefully place a piece of tissue paper (here I used a dress pattern) onto the paper. Be very careful, the paper will be very sticky! Flatten out all the air pockets and wrinkles. Let it dry a few minutes. Put through your printer to print whatever photos you would like onto it. Let the ink dry for a minute or two. Then carefully peel off the tissue paper. This pattern paper was so thin that it ripped quite a bit, so I worked that into the design. Regular tissue paper should be a bit less fragile.
Fabric
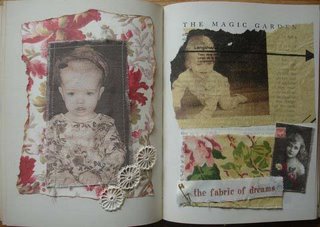
Printing onto fabric is very similar to printing on tissue paper. To make a "carrier" for fabric to print onto, you use freezer paper. You cut a piece of freezer paper 8.5x11" and iron the shiny side of the freezer paper onto a piece of muslin fabric. This is a white or off white colored, thin, cotton fabric. You can then put the piece of fabric attached to the freezer paper into your printer and print your pictures onto it. Make sure it is fabric side up, so you are printing directly onto the fabric. You can also print words onto the paper. Whatever you'd like! You can then sew or glue your fabric picture to your page. *If you're afraid of jamming up your printer (this has not happened to me), you can always buy the t-shirt iron on transfer paper, print an image onto it and iron it onto muslin.
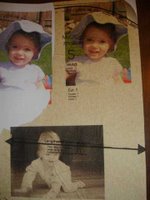
Vintage pictures~ "Instant ancestors"
These can be found at flea markets, estate sales or maybe in your own attic! They are very fun to use. Some people call them "rescused relatives" because people feel they've rescused these people from oblivion. They like to make up stories for these people with their art. I still need to add this little pixie to my altered book.

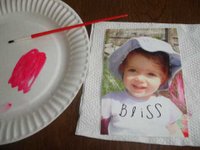
Manipulated pictures
One easy way to manipulate a picture is with fine grade sand paper. It will make scratch marks on the photo and will take off some of the color. If you want to add a color wash to the picture, you can then just paint over with watercolor paints. Karen Michel's book Altered Imagery has many fun ideas for manipulating photographs. Here I used my new letter stamps. Woops, the "s" are upside down. oh well:)

As I mentioned, there are many, many techniques you can use with your photos. Here is one good resource with many techniques to try. Here are a couple of more. One using packing tape and the other with gel medium. I know you all use photos in your art and your BOD already. I hope that this will provide some inspiration for you to try something new. Can't wait to see what you come up with!
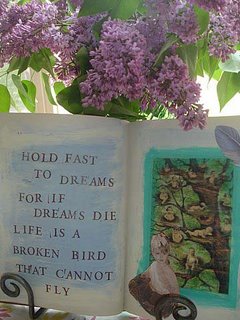
I keep redefining my Book of Dreams. It seems to have evolved into the theme of Dreams of a Little Girl. I think I will continue to add quotes to many of my pages, probably long after this project is done:)
28 comments:
Please visit my post of last weeks topic with layers (something I love to do!):
iHanna's layers!
Can't wait to try some of these methods out. :-)
Great pages!
Oh thank you, I can't wait to get started with this. You are amazing. Thanks for the wonderful links too and
ps thanks for your nice comments, I have more pages posted this morning.
Sharon
good morning my sweet muse! Well, looks like you've inspired me once again. I finished my 'layers' last night. I can't wait to start on this one...hmmm...transparencies...a girl can have so so much fun with these!!!!
Love all these ideas. Can't wait to get started.
Love your challenge...
I am looking forward to start on this.... :)
Have a nice day
Wow I feel inspired to at least try some of these techniques I'm learning so much doing this book.
I did add a couple of entries last night for the layered look I also added a hidden pocket right under the pic following your direction.
Unfortunately I'm having glue issues all my pages are comming up undone from the glue stick I used.
TFL
My entries are on my blog.
www.mphoinix.blogpsot.com
Maggie
You've been a busy girl! Thanks so much for finding all these technique goodies for us :)
good stuff! thanks. can't wait to get started, but i still have to finish my "layers" first!
love all of these techniques, so coll that you are posting all of the ideas, too. Love you BOD, that is such a good idea.
wow! this is like an online course in AB's! love the work you've done! I will be working on my book today. I've had a "dry" spell. I tried the layering last week and found I'm not very patient about building them! I am learning so much though and really being challenged here! thanks for doing such a magnificent job of presenting this challenge!
http://lafeecoriandre.blogspot.com/2006/05/my-mixed-media-gallery-and-my-book-of.html
here is my contribution. It was fun :)
p.s. you are amazing at this! my favorite is with the fabric and your daughter in it. the next one too. thank you for the amazing links. have you gotten a book deal yet?
Thank you very much for your lovely comment on my blog. The white stamping is just made with simple stamp ink :)
love all the inspiration for this week- some great ideas.
I just posted my week one entry to my blog (falling behind, a bit) If anyone wants to take a look, i'll be happy for any comments :)
Oh. My. This week is going to be fun! Thanks for the information and inspiration!
Wow! Some great ideas for printing photos! I totally want to try some of these with my little ones' photos. Thanks for commenting on my blog, by the way! I took a look at your altered baby book and there are some great ideas in there as well!
hi! It's not too late to join my Ephemera Exchange if you'd like to. Just send me your packets by the end of May. All the details are on my blog! Thanks!
I've finished a couple more pages... with pockets!
I don't know why it takes me so long to finish a page! Maybe with experience I'll get faster. I'm having so much fun, though, loving every minute :)
A couple more pages...
http://makemineblissful.blogspot.com/
Just discovered you... really interesting.. shall be re-visiting often. I have linked you to my own blog and look forward to exploring your links which also look great.
Got a couple more pages done! This time with a tricky little pocket :)
BOOK OF DREAMS....so what is your Blog? A BLOG OF DREAMS ....Well I certainly think so ....your blog is great and thanx for sharing all these tips with us............much appreciated. Am off to read all
ciao ciao joan in italy
ps I've just started my blogs and I'm just loving it
All this transfer and image-techniques are SO inspiering.
I tried to make a transfer from a transparency, but as I couldn't get a gelmedium here in Oslo I tried my decopage-medium, and certanly didn't succseed, as the transparency sticked to the page. But I still want to try some more of these techniques. Seems so fun.
My first page for this 3rd technique can be viewed here: http://papirbloggen.blogspot.com/2006/05/book-of-dreams_16.html
This have been a realy great challenge... :) I have printed a picture on a very thin fabric, mostly used in quilting, and you can see the text true the fabric.
I think I will do some more layouts with this tecnique.
Have a nice day.
Here's my week three post:
http://jeanneszewczyk.blogspot.com/2006/05/book-of-dreams-week-three-images.html
I posted for this week. no cool transparency, but I really worked on layering from the previous week! I will try again, but wanted to let you know I posted today! take care! Lia
p.s.I don't remember if I commented, but I love the work you have done on your book! your daughter is SO adorable too!
I work for Help.com and I got a question from a site user that stumped me. After coming across your blog it occured to me that maybe you might be able to suggest an answer. I'd certainly appreciate any ideas you might have. I thank you in advance for any help you might give. Here's the question:
"I am working with an art project and I need to transfer some handwritten text onto a wall. I can not use screen-printing because it would not allow me to reach into the corners. Adhesive vinyl would also not be suitable. Does anyone know any other methods?"
http://matteorosa.blogs.help.com/post/3/transfer-text-or-image-to-a-wall
Thanks!
Unbelievable how creative you are. I love Langston Hughes' poem so I read every word. I had no idea you could print photos on fabric and tissue...
My postmodern photography class last semester covered a lot on copyright issues for photos. Today I came across this information that you might find interesting on a flickr discussion. The additional link outs for information are good, too.
link here
Cheers.
Post a Comment