

The first technique is one that can be done with the cover of your book, if you haven't worked on that yet. I knew I wanted to use these doll shoes and a picture of my daughter and myself around the same age. First, you mark the edges of the hole you want to cut. Place a cutting mat inside the cover to protect the pages of the book. Then cut through the cover using a craft knife and the ruler as a guide to cut straight lines. This process takes a bit. My cover was pretty thick, so I cut through bit by bit until I could push the piece through and was left with the hole. You can then paint the front, the inner edges, the inside, whatever you'd like. Place an image (or in this case some doll shoes) inside the hole and you're set! Here are a couple more wonderful ideas on cover niches and doors.

Next, I tried a window with the pixie picture I did last week. I used mica as the window "glass". There are many different ways to do windows. Some simple techniques would be to cut a circle, or triangle, or even rip a hole in the page. Then put an image on the page behind it, as if it is looking through the window. What I did here is, I drew an "X" on the page with my craft knife. Again, be sure and have a cutting mat behind the page, so that you don't cut through more than you want! I then folded back each triangle from the "X: and folded each again. Placing an image on the following page, you get the window effect.


A similar technique is used in creating a door. Doors are interactive, drawing the observer into the page. You can either use a stamp or here I used two doors from a magazine. I put them on with tiny little hinges and cut out the page behind the door. I then placed an image on the following page, like what we did with a window. When you open the door, you can see what is revealed.
The last technique, I've always wanted to try. Paula shared a link to Karen's web site and her *amazing* reliquaries and I knew I just had to give this a shot. Also check out her altered books and prepare to be inspired! I had this giant charm from a necklace I've had for years. I knew it would be perfect for this niche:)
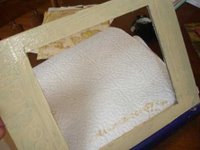
A niche or shadowbox is used to hold large embellishments or objects that would not otherwise fit into an altered book. It is created by making a deep cut into a block of pages. To start, it is best to use the front or back cover of the book as the bottom of your box to provide best support. I used the back of the book. Gather a group of pages that begins or ends with a page next to a cover. The thickness of the group determines the depth of your box. Use a flat brush to apply gel medium to the side, top and bottom edges of this group of pages. Hold the pages together with bulldog clips while it dries. Once it is dry, you use the same technique we did on the cover. Mark the box that you'd like to cut, put a cutting mat between the group of pages and the cover. Using a cutting knife and a ruler, gradually slice through the layers of pages. Then apply glue to the back of the block of pages and adhere to the cover or back of the book. Paint and embellish however you'd like!

Here are a couple another tutorials on creating a niche.
Hope you all have a great week. Please share links to any pages that you post on your blog in the comments. Thanks!
15 comments:
Way cool techniques! Thanks so much, fearless leader. And thanks for you kind attention, lovely comments :)
I've not been posting my progress on my blog as I decided that my book would contain secrets... however I do really appreciate your suggestions and today I was looking at doll's house doors with the idea that one could become a door to my Book of Secret Dreams.
Something I've done in the past is to use images like cookers and make their doors openable - its fun to see a landscape being baked.
Anyway I wanted to say thank you and I am playing along just not showing what I'm up to!
i love these techniques. i am planning to get back to my book this week.
This goes back a bit but here is the information about how I did my cover: http://harmonyinline.blogspot.com/2006/05/book-of-dreams-what-i-did.html
Some new pages...I tried my hand at a scalloped page edge and a cute little window :)
Hello:
I luv all the new techniques you ahve posted and Lili is keeping me busy with all the wonderful pages. I'm trying to recreate the family tag she created.
I didn't have any luck with transparencies. I purchase 3m transparencies for inkjet. After 3 days all the word art I've create just smeared on the transparency.
Any suggestions anyone?
Have a great day
Maggie
Love your cover!!!
For anyone who is interested in submitting their alterd/handmade books this was forwarded to me:
Quoting from the site:
"500 Handmade Books will be a juried gallery book featuring the best in
contemporary book arts. We desire all kinds of bindings, media, and
interpretations. Among others, we'll accept miniatures, pop-ups,
abecedaries, and illustrated books; or books blank, printed, or written in. 500 Handmade Books, to be released in Spring 2007, aims to inspire both beginner and professional bookmakers...."
See http://www.larkbooks.com/submissions/ArtistsEntryForms.asp
for more info.
Windows, doors & niches, what a great post re dream books. I am afraid that I am still dreaming and not getting around to making my book. It's the time of year that garden and lawn, tree and meadow, bird, insect, and spider seem to be always calling. I need to work on my old teacher time management skills.
wow - way cool - loving following this!
O.K. the little girl page with the tiny shoes is ultra cute-adorable-i may just have to break down and actually take on a book and try this technique insted of just looking.-just brilliant!
Just posted my niche pages. Having lots of fun with this project.
http://jeanneszewczyk.blogspot.com/2006/05/book-of-dreams-week-4-niches.html
gorgoeus1
I just completed my BOD window pages. Have to get going on the door pages soon.
http://jeanneszewczyk.blogspot.com
I can't wait to do this!
I am beginning an altered bok for my daughter to take to Spain this month. hope to have some pictures to share soon. Thanks for all the terrific ideas.
Post a Comment