
In the meantime, this week we're talking about METAL. I've been looking forward to this one! I feel a bit unprepared in the sense that I have several techniques to show you, but don't have my finished pages done. I will be posting those as I finish them. Hopefully in the next few days:)
Faux Metal~
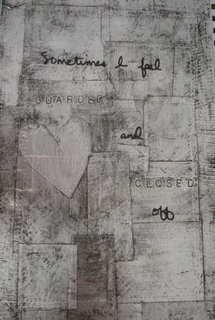
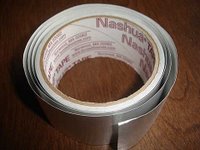
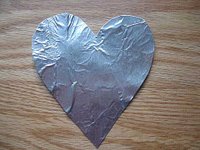
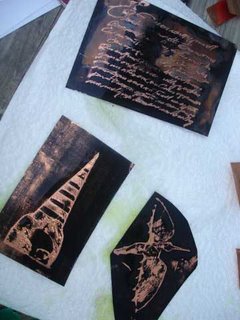
I haven't worked a whole lot with metal, but I love the look so I tried out a few new techniques myself this week. The first one is one that I learned from Karen Michel. I have seen her use this technique on several different projects. It's actually a faux metal. It's very easy to work with and gives unique results. You start with a roll of aluminum foil tape. This has a PVC film backing and is used for heating ventilation and air conditioning applications. I found it at Home Depot. For this page (above) that I did during the 21 day challenge a few months back, I simply cut the tape into different size rectangles. I then went around each rectangle close to the edge with a tracing wheel which could be found at any fabric store. This made tiny little uniform dots around the edges that almost give it a quilted look. I then peeled the backing off the tape and layered the pieces haphazardly to cover my page. Then you simply add a few drops of India Ink spread it around with a paper towel and let it sit for a short while (about a minute). While it's still wet wipe off ink with a clean paper towel. You will see that the ink fills in the holes and any design that you put on your tape. You can rub it all off and the tape will be shiny or leave a bit of black for more of a distressed metal look. Very easy and fun!
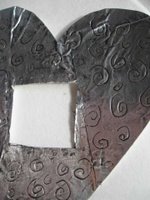
Using the same technique as above, I layered a few pieces of tape together on a piece of wax paper. I then cut out a heart and cut a small square in the center. Using the eye end of a needle, I carefully carved swirls onto the tape. You could use any object that isn't too sharp to poke through the tape and make any designs you would like. Let your imagniation run wild!
Metal words~
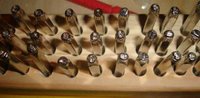
To make metal words, you will need a letter punch set. This can also be found at the hardware store. You can then gently tap the letter onto a sheet of metal (I like to use copper) and make your word. You can again add India ink to it or you could use aging paints for a weathered look. If you don't have a punch set you can use the foil tape we used in the above technique and just carve letters into it by hand, it is very soft and easy to work with.
Aging metal~
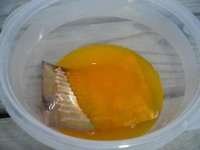
This technique I have been wanting to try for a long time. I haven't because it involves using a chemical. However, I really wanted to see how liver of sulphur ages metal, so I got out my goggles and my gloves, went outside and gave it a whirl. You DO NOT want to get this on your skin, it can cause a chemical burn. Place one tablespoon of potassium polysulfide (liver of sulphur) in a plastic container. Add one cup of water and stir. Set aside. Spread a very thin layer of petroluem jelly onto wax paper. Pick a favorite stamp and stamp into the petroluem jelly on the wax paper and then stamp onto a small piece of copper. Clean the stamps with a wet sponge. With tweezers, place the stamped copper into the plastic container of liver of sulphur for several seconds. The sulphur should start to "antique" the copper and the stamped image will remain clean. The petroluem jelly will act as a resist. Remove the copper with tweezers and place it onto paper towels. Let it dry thoroughly. Buff the copper on both sides with a paper towel. Some of the sulphur will flake off.

The "authentic" (and less caustic) way to age metal is to create an actual rust. Claudine Hellmuth explains this technique in her book Collage Discovery Workshop. The fumes can be toxic, so make sure you do this outside. You can do this by mixing a solution of half bleach, half vingear. Make enough to completely cover the objects you want to rust. Drop your metal into the solution. Some metal objects may require a light sanding with steel wool to get the protective coating off so they will rust properly. Tin pieces should rust in a matter of minutes. If you are using other metals, other than tin, you may need to leave them in the solution anywere from two days to a week. Once your objects are rusted, set them out to dry on paper towels.
Since I haven't provided a lot of finished art work this week, here are some fun links to go to for lots of inspiration. The lovely Belinda Schneider shows some art using mesh and talks about liver of sulphur. Her art is even on dreams, how perfect! LK Ludwig uses quite a bit of metal in her work in ingenious ways. Also, in the Winter 2005 issue of Cloth, Paper, Scissors magazine there is an extensive article on transferring images to metal.
This week I challenge you to use metal somewhere in your work. Some other ideas that I haven't show here are using mesh, which can be folded so the edges are smooth. You can attach with eyelets or brads. It looks neat to fold mesh into a pocket on your page. Don't forget about staples! Many found objects are metal. Think about what you might find on the street that you could use, soda twist tops, safety pins, hinges, washers, keys, you name it! Have fun, can't wait to see your work:)
15 comments:
Oh my goodness, this will certainly be new and I bet fun.
Wow This is really getting me outside of my comfort zone.
Have a great week
Maggie
wow...
you are such an inspiration...
i love the letter punchers! great ideas.. I can't wait to use it on furniture.. we'll see how :) thank you so much
Very cool!
Yes! Really looking foreward to this metal-project. Seems to me it can be fun. :-)
Just submitted my window-project, the last weeks challenge, on my blog. I enjoyed the idea of making windows alot. ;-)
I finally have some pages posted. I luv the window and pocket ideas, still doing pockets etc..
Will give the metal a try still trying to ge transparencies going. I've learned a lot and luv all the new techniques.
Thank You,
Have a great weekend
Maggie
this looks great but I guess I'll be having hard time to find the "ingredients" for this recipe :) I'll see what I can do :)Thbaks for the inspiration :)
Hey Kari, I'm having a real problem with my e-mail. Hope you get this OK, the record album sounds like a great idea! I will try to email you tomorrow if my computer is working, just didn't want you to think I wasn't answering. Love all your new pages going to have to try a few of those techniques, so cool! I finally got started on week 3, sorry being so slow. Take care, if I can't get in touch with you before we leave on Sunday, have a great week!!!
Hello Everyone:
Added more pages on my blog.
Have a great weekend.
Maggie
http://mphoinix.blogspot.com/
Great topic! I have actually been wondering how I could incorporate metal into may pages and how to work with metal. Where do you get your metal from? Can you buy thin sheets of it somewhere?
Sorry I haven't posted any pages for the past few days. Allergies have got me down and I'm in a bit of a slump. I'm hoping I can pull myself together soon. My book still has plenty of pages waiting to be decorated :)
Just wanted to say,
"my metal page is done."
I'm back! I've done a couple more pages, involving my crazy family :)
I just posted my metal pages and it's only 3 minutes after the deadline....in the central time zone that is!
http://jeanneszewczyk.blogspot.com/2006/05/abook-of-dreams-week-5-metal.html
Post a Comment